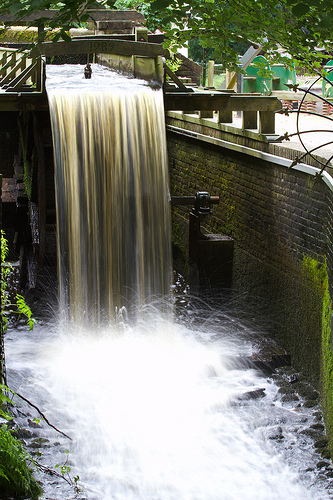
The “S” stands for shutter speed. Use low shutter speed to get sharp pictures when capturing moving objects. Set the shutter speed to higher speeds for creating a more experimental picture. This is a cool feature to use when getting photos of fireworks or tail lights on a car. It is an easy way to get artistic features in your photos.
Learn how to use the ISO setting on your camera. It is the setting that determines the film speed. The higher you set your ISO, the more light that will come in. If you increase the ISO in dark settings you will capture more light making the photo turn out better.
It is important to combine your ISO, aperture, and correct shutter speed. These three features are what determine your photo’s exposure. You do not want to have an overexposed or underexposed photograph if you can avoid it, unless this is what you were originally looking for. Do a little experimenting and you will soon understand the relationship between these three features.
Use a variety of shutter speeds to get unusual shots. It is standard practice to use the fastest possible shutter speed to freeze action, but think of what you could do with a slow shutter speed, such as 1/30. Find a moving object passing by, such as a bicycle. You will get a perfect image of the cyclist, but the background will have interesting streaks showing speed.
Blur can ruin an otherwise, great picture. There are a few ways you can fix blur. One way is to assure the camera is still. You can do this by using a tripod or bracing yourself so it is easier to keep the camera still. You can also use your camera’s action mode. This will automatically adjust your camera’s speed settings and help stop the blur.
Know about film speeds when you are trying to take the best pictures. Faster film speeds tend to be grainier, and less focused, than slower speed film. Slower speed film needs much more light to take good shots. 400 speed film is good multipurpose film while slower speeds are better for composed images.
It’s time for your tripod. Take it out of the closet and find the cable release. Still have those neutral density filters? Get them too. You’re going for a night shoot at the school fair. You have arrived. See the pretty colored lighting at the booths and rides? You will photograph the Ferris wheel, exposing not for the overall scene but for the lights. Place the camera on the tripod and attach the cable release. Set the ISO low, at 100 or if possible, lower. Use a shutter speed of maybe fifteen seconds. Set the aperture at f/16 or smaller if your camera can do it this will make pinpoint lights look like stars. Take some test exposures and make adjustments, and use your neutral density filters if necessary. You have a finished product! Thanks to the tripod, everything is sharp except for the ghostly images of fair goers moving about, and the turning Ferris wheel appears as a circular streak of gorgeous colors. The lights at the booths shine like stars.
Those are only a few of the tricks out there to help you take amazing photos. But photography isn’t something you will learn over night, so remember these tricks and try them out until you get the hang of them. Before you know it, you’ll be taking professional quality photos!